วันพฤหัสบดีที่ 23 พฤษภาคม พ.ศ. 2556

BIPOLAR STEPPER MOTOR CONTROL CIRCUIT


         In this circuit, a potentiometer controls both the speed and direction of a small bipolar stepping motor like those found in many 5 1/4" floppy disk drives. Note that the bipolar motors are distinguished from "unipolar" types, in that bipolar units have two coils instead of four, and four wires instead of five. With the potentiometer at the extreme counterclockwise position, the motor runs counterclockwise at the maximum speed. Rotating the potentiometer toward the center slows the motor, until it stops. Continuing potentiometer rotation clockwise, the motor starts to run clockwise, increasing in speed to the maximum clockwise position.
Operational amplifiers U1A and U1B and their associated components form an absolute value circuit with a reference of one half the supply voltage (+4.5 volts). With the potentiometer slider at either extreme position, the output at U1B is about 6 volts, decreasing linearly to +4.5 volts as the slider is moved to the center position.
         Operational amplifier U1D is configured as an integrator, and U2B as a voltage comparator. Together, they form an oscillator. U1C, with its diode, is a voltage-controlled clamp that permits voltage control of the oscillator's frequency from the output of the U1A-U1B absolute-value circuit. The threshold of oscillation depends on the voltage present at U1D's positive input, approximately 4.7 volts. Oscillation will not occur below this level, corresponding to the central segment of the potentiometer's control arc, for which the motor is stopped.
The output pulses from U2B are fed to the clock input of the U3 up-down counter. Comparitor U2A detects which side the potentiometer slider is located with respect to center, and it controls the counter's direction. U3's Q1 and Q2 outputs are decoded into a one-of-four sequence by U4, that in turn drives the inputs of "or" gates U5A through D. A quadrature wave pattern, required for motor rotation, results at the four gate outputs. The eight MOSFET power transistors, configured as two "H" bridges, serve as current amplifiers to drive the motor's coils.
       The values shown in the U1D and U2B oscillator section provide a frequency range of approximately 1 to 100 Hertz, corresponding to a motor speed of 0.6 to 60 RPM. Although 9 volts is indicated, the circuit will operate from 6 to 12 volts, with higher voltages providing greater torque. The circuit's speed range will be the same for any given supply voltage within the specified limits, due to the circuit's ratiometeric reference. The Matsushita KP39HM4-016 motor is rated 12 volts, 80 milliamperes per coil, and rotates 3.6 degrees per step.

Stepper Motor Driver (74194)


       Probably the simplest, reversible drive circuit is the H-Bridge. Some BEAMbots use H-bridge motor drivers; many more use an H-bridge variant of some sort. Here's a simple conceptual schematic: Image Based on the SN74LS194 - Bidirectional Universal Shift Register the circuit is designed to drive UNIPOLAR type stepper motors and provides only basic control functions - Forward, Reverse, Stop and Speed adjustment. The only step angle for this driver is the design step angle for the motor. The circuit is not complex and is cheaper than many dedicated driver/controller devices and the parts are easy to find.

Stepper Motor Driver (74194)

This page links to UNIPOLAR and BIPOLAR stepper motor driver pages. The drivers are designed for simple requirement applications and are made with parts that are available from a variety of sources.

Both of the stepper drivers are use a 74194 - Bidirectional Universal Shift Register from the 74LS or 74HC - TTL families of logic devices to produce the stepping function. A diagram at the bottom of this page shows the difference between the 74194 - UNIPOLAR and BIPOLAR stepping pattern generation.

The UNIPOLAR driver uses a ULN2003 - eight segment, darlington IC as its output device.

The BIPOLAR driver uses a SN74410 - four segment, Quad - 1/2 H-Bridge IC as its output device.

These stepper drivers have only basic control functions: Forward, Reverse and Stop and Step rate adjustment. The calculated Step rate adjustment range of the drivers is 0.72 (1.39 sec) to 145 steps per second. (Lower and higher step rates are also possible.)

The only step angle for these drivers is the design step angle of the motor itself. 'Half-stepping' is not possible with either of the driver circuits.


Stepper Motor Driver (74194)


Stepper Motor Driver (74194)


Stepper Motor Driver (74194)

Stepper Motor Driver (74194)

วันพุธที่ 22 พฤษภาคม พ.ศ. 2556

A4983 Stepper Motor Driver Carrier


Overview

This product is a carrier board or breakout board for Allegro’s A4983 DMOS Microstepping Driver with Translator; we therefore recommend careful reading of the A4983 datasheet (368k pdf) before using this product. This stepper motor driver lets you control one bipolar stepper motor at up to 2 A output current per coil (see the Power Dissipation Considerations section below for more information). Here are some of the driver’s key features:
  • Simple step and direction control interface
  • Five different step resolutions: full-step, half-step, quarter-step, eighth-step, and sixteenth-step
  • Adjustable current control lets you set the maximum current output with a potentiometer, which lets you use voltages above your stepper motor’s rated voltage to achieve higher step rates
  • Intelligent chopping control that automatically selects the correct current decay mode (fast decay or slow decay)
  • Over-temperature thermal shutdown, under-voltage lockout, and crossover-current protection
Like nearly all our other carrier boards, this product ships with all surface-mount components—including the A4983 driver IC—installed as shown in the product picture.
We also sell a larger version of the A4983 carrier that has reverse power protection on the main power input and built-in 5 V and 3.3 V voltage regulators that eliminate the need for separate logic and motor supplies.

Included hardware

The A4983 stepper motor driver carrier comes with one 1×16-pin breakaway 0.1" male header. The headers can be soldered in for use with solderless breadboards or 0.1" female connectors. You can also solder your motor leads and other connections directly to the board.

Using the driver

Minimal wiring diagram for connecting a microcontroller to an A4983 stepper motor driver carrier (full-step mode).

Power connections

The driver requires a logic supply voltage (3 – 5.5 V) to be connected across the VDD and GND pins and a motor supply voltage of (8 – 35 V) to be connected across VMOT and GND. These supplies should have appropriate decoupling capacitors close to the board, and they should be capable of delivering the expected currents (peaks up to 4 A for the motor supply). We also sell a version of the A4983 carrier with 5 V or 3.3 V voltage regulators eliminating the need for separate logic and motor supplies.

Motor connections

Four, six, and eight-wire stepper motors can be driven by the A4983 if they are properly connected; a FAQ answer explains the proper wirings in detail.
Warning: Connecting or disconnecting a stepper motor while the driver is powered can destroy the driver. (More generally, rewiring anything while it is powered is asking for trouble.)

Step (and microstep) size

Stepper motors typically have a step size specification (e.g. 1.8° or 200 steps per revolution), which applies to full steps. A microstepping driver such as the A4983 allows higher resolutions by allowing intermediate step locations, which are achieved by energizing the coils with intermediate current levels. For instance, driving a motor in quarter-step mode will give the 200-step-per-revolution motor 800 microsteps per revolution by using four different current levels.
The resolution (step size) selector inputs (MS1, MS2, MS3) enable selection from the five step resolutions according to the table below. MS2 and MS3 have internal 100kΩ pull-down resistors, but MS1 does not, so it must be connected externally. For the microstep modes to function correctly, the current limit must be set low enough (see below) so that current limiting gets engaged. Otherwise, the intermediate current levels will not be correctly maintained, and the motor will effectively operate in a full-step mode.
MS1MS2MS3Microstep Resolution
LowLowLowFull step
HighLowLowHalf step
LowHighLowQuarter step
HighHighLowEighth step
HighHighHighSixteenth step

Control inputs

Each pulse to the STEP input corresponds to one microstep of the stepper motor in the direction selected by the DIR pin. Note that the STEP and DIR pins are not pulled to any particular voltage internally, so you should not leave either of these pins floating in your application. If you just want rotation in a single direction, you can tie DIR directly to VCC or GND. The chip has three different inputs for controlling its many power states: RSTSLP, and EN. For details about these power states, see the datasheet. Please note that the RST pin is floating; if you are not using the pin, you can connect it to the adjacent SLP pin on the PCB.

Current limiting

To achieve high step rates, the motor supply is typically much higher than would be permissible without active current limiting. For instance, a typical stepper motor might have a maximum current rating of 1 A with a 5Ω coil resistance, which would indicate a maximum motor supply of 5 V. Using such a motor with 12 V would allow higher step rates, but the current must actively be limited to under 1 A to prevent damage to the motor.
The A4983 supports such active current limiting, and the trimmer potentiometer on the board can be used to set the current limit. One way to set the current limit is to put the driver into full-step mode and to measure the current running through a single motor coil without clocking the STEP input. The measured current will be 0.7 times the current limit (since both coils are always on and limited to 70% in full-step mode). Please note that the current limit is dependent on the Vdd voltage.
Another way to set the current limit is to measure the voltage on the “ref” pin and to calculate the resulting current limit (the current sense resistors are 0.05Ω). The ref pin voltage is accessible on a via that is circled on the bottom silkscreen of the circuit board. See the A4983 datasheet for more information.

Power dissipation considerations

The A4983 driver IC has a maximum current rating of 2 A per coil, but the actual current you can deliver depends on how well you can keep the IC cool. The carrier’s printed circuit board is designed to draw heat out of the IC, but to supply more than approximately 1 A per coil, a heat sink or other cooling method is required.
This product can get hot enough to burn you long before the chip overheats. Take care when handling this product and other components connected to it.
Please note that measuring the current draw at the power supply does not necessarily provide an accurate measure of the coil current. Since the input voltage to the driver can be significantly higher than the coil voltage, the measured current on the power supply can be quite a bit lower than the coil current (the driver and coil basically act like a switching step-down power supply). Also, if the supply voltage is very high compared to what the motor needs to achieve the set current, the duty cycle will be very low, which also leads to significant differences between average and RMS currents.

Schematic diagram

Schematic diagram of the md09b A4983 stepper motor driver carrier.

วันอังคารที่ 21 พฤษภาคม พ.ศ. 2556

Stepper motor controller circuit


Description.
Here is the circuit diagram of a simple stepper motor controller using only elementary parts. The driver circuit uses, four transistor (SL100) to drive the motor windings, two NOT gates and one XOR gate to decode the two bit control logic to drive the four windings of the motor. The diodes D1 to D4 protects the corresponding transistors from transients generated during the switching of motor windings. d0 and d1 are the control logics which determines the direction of rotation as well as speed.
Circuit diagram with Parts list.
stepper-motor-control-circuit.JPG
Notes.
  • The control logic for the circuit can be obtained from a 2 bit up/down counter clocked by a 555 astable multivibrator.The direction of count determines the direction of rotation and the frequency of astable multivibrator determines the speed of rotation.
  • As shown in the schematic above, IC1a IC1b belongs to same IC 7404.
  • Pin 14 and pin 7 of both IC1 and IC2 must be connected to +5 V and ground respectively, though it is not shown in circuit diagram.
  • The 5V can be obtained from a 7805 based power supply circuit.
  • 5V power supply using IC 7805.Click Here.
  • Vcc is the voltage required for the stepper motor. It varies from motor to motor. Here we can use up to 24V stepper motors. For higher operating voltages and power the SL100 transistors must be replaced with higher power transistors like 2N3055.
Truth table for clockwise rotation.
stepper-motor-control-truth-table.JPG

Stepper Motors & Drivers


Stepper Motors & Drivers

A stepper motor is used to achieve precise positioning via digital control. The motor operates by accurately synchronizing with the pulse signal output from the controller to the driver. Stepper motors, with their ability to produce high torque at a low speed while minimizing vibration, are ideal for applications requiring quick positioning over a short distance.
  • Stepper motors enable accurate positioning with ease. They are used in various types of equipment for accurate rotation angle and speed control using pulse signals. Stepper motors generate high torque with a compact body, and are ideal for quick acceleration and response. Stepper motors also hold their position at stop, due to their mechanical design. Stepper motor solutions consist of a driver (takes pulse signals in and converts them to motor motion) and a stepper motor. Oriental Motor offers many solutions for a wide variety of applications.

Accurate Positioning in Fine Steps

StepsA stepper motor rotates with a fixed step angle, just like the second hand of a clock. This angle is called "basic step angle". Oriental Motor offers stepper motors with a basic step angle of 0.36°, 0.72°, 0.9° and 1.8°.

Easy Control with Pulse Signals

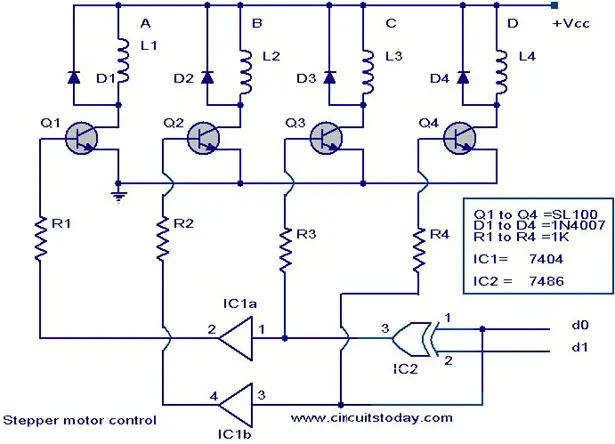
A system configuration for high accuracy positioning is shown below. The rotation angle and speed of the stepper motor can be controlled with precise accuracy by using pulse signals from the controller.
Stepper Motor System

What is a Pulse Signal?

Pulse Signal
A pulse signal is an electrical signal whose voltage level changes repeatedly between ON and OFF. Each ON/OFF cycle is counted as one pulse. A command with one pulse causes the motor output shaft to turn by one step. The signal levels corresponding to voltage ON and OFF conditions are referred to as "H" and "L" respectively.

The Amount of Rotation is Proportional to the Number of Pulses

RotationThe amount the stepper motor rotates is proportional to the number of pulse signals (pulse number) given to the driver. The relationship of the stepper motor's rotation (rotation angle of the motor output shaft) and pulse number is expressed as follows:

The Speed is Proportional to the Pulse Speed

SpeedThe speed of the stepper motor is proportional to the speed of pulse signals (pulse frequency) given to the driver. The relationship of the pulse speed [Hz] and motor speed [r/min] is expressed as follows:

Generating High Torque with a Compact Body

Stepper motors generate high torque with a compact body. These features give them excellent acceleration and response, which in turn makes these motors well-suited for torque-demanding applications where the motor must start and stop frequently. To meet the need for greater torque at low speed, Oriental Motor also has geared motors combining compact design and high torque.
Torque

The Motor Holds Itself at a Stopped Positioning

Stepper motors continue to generate holding torque even at standstill. This means that the motor can be held at a stopped position without using a mechanical brake.
Once the power is cut off, the self-holding torque of the motor is lost and the motor can no longer be held at the stopped position in vertical operations or when an external force is applied. In lift and similar applications, use an electromagnetic brake type.
Holding

Closed Loop Stepper Motor and Driver Package - AlphaStep

The AlphaStep consists of package products designed to draw out the maximum features of a stepper motor. These packages normally operate synchronously with pulse commands, but when a sudden acceleration or load change occurs, a unique control mode maintains positioning operation. AlphaStep models can also output positioning completion and alarm signals, which increase the reliability of the equipment which they operate.
AlphaStep

Types of Operation Systems

Each stepper motor and driver package combines a stepper motor selected from various types, with a dedicated driver. Drivers that operate in the pulse input mode and built-in controller mode are available. You can select a desired combination according to the required operation system.
Pulse Input Package
The motor can be controlled using a pulse generator provided by the user. Operation data is input to the pulse generator beforehand. The user then selects the operation data on the host programmable controller, then inputs the operation command.
Pulse Input System

Built-in Controller Package
The built-in pulse generation function allows the motor to be driven via a directly connected personal computer or programmable controller. Since no separate pulse generator is required, drivers of this type save space and simplify wiring.
Built-in Controller System

Difference Between AC Input and DC Input Characteristics
A stepper motor is driven by a DC voltage applied through a driver. In Oriental Motor's 24 VDC input motor and driver systems, 24 VDC is applied to the motor. In the 100-115 VAC motor and driver systems, the input is rectified to DC and then approximately 140 VDC is applied to the motor (certain products are exceptions to this.)
This difference in voltage applied to the motors appears as a difference in torque characteristics at high speeds. This is due to the fact that the higher the applied voltage is, the faster the current rise through the motor windings will be, facilitating the application of rated current at higher speeds. Thus, the AC input motor and driver system has superior torque characteristics over a wide speed range, from low to high speeds, offering a large speed ratio.
It is recommended that AC input motor and driver systems, which are compatible over a wider range of operating conditions than DC input systems, be considered for your application.
AC / DC Torque